Home
Lesson
1 Lesson
2 Lesson
3 Lesson
4 Lesson
5 Lesson
6
Light Sensors
Topics
Light Sensors
Preparation
Take several large poster boards and add alternating black and green lines at
regular intervals. (Electrical tape works well for this)
Attach light sensors to each robot and upload a simple program that uses a light
sensor and run it once. I recommend a go light, a light sensor wait-for and a
stop light in that order. Do this with all the robots. The reason is that the
RCX will not recognize the light sensor unless it has been used once. The
beginning of this lesson has the students using the view panel on the RCX
without programming anything so the light sensor needs to be set.
Handouts
Light Sensor Handout
Lesson
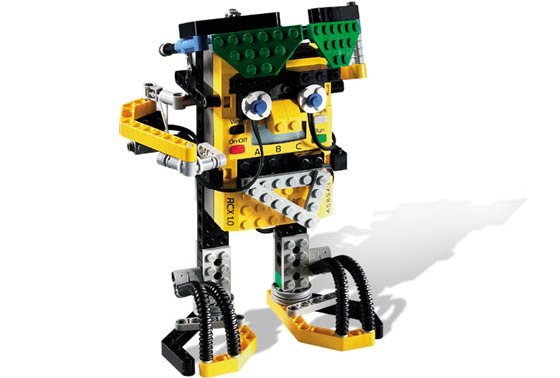
Begin by explaining that you have attached light sensors to all the robots. Show
them a robot with the light sensor attached and explain what it is and how it
works. The light sensor uses infrared light to determine how bright something
is. The light sensor produces a value between 0 and 100. 100 being complete
light and 0 being complete dark.
Now show the students how to view what the light sensor is currently reading.
This is done by turning on the RCX and pressing the view button until the arrow
at the top of the screen is under the port the light sensor is plugged into. For
example my light sensor is connected to port 2. I would turn on the RCX and
press the View button twice. Next to the image of the robot man is a number
between 0 and 100, this is the value being read by the light sensor.
Have the students try the light sensor on a nearby object like their desk. Write
the numbers each student got on the board. (Note these numbers should be
different) If possible have the posters you made earlier out on the desks and
have the students try the light sensor on the white, black and green sections.
Write down what each group got on the board. Again these number should be
similar but not the same.
Ask the class why the numbers arn't all the same.
The answer is do to the differences in lighting and coloration. One student's
desk may be slightly darker than the other. One student may be near a window or
directly under a light. To show this turn off or dim the lights in the room and
have the students see how the values change. (They should go down)
Now that they understand why the numbers are different you need to explain how
they are similar. The numbers in each column should be similar to each other and
different from the other columns. So for example black should always have
smaller numbers than white. You might try showing this by mapping the numbers on
a line to show that all the black readings are at one end, green in the middle
and white at the opposite end from black.
Building on the above example you need to go over boundary values. How to pick a
number that marks the difference between black and white. So for black and white
show them how to pick a number so that every number greater than that number is
white and everything darker is black. (ignoring green for now) Then add green
back in and have them come up with a boundary between black and green, and green
and white.
Now you are finally ready to re-introduce if/else, loops and wait-fors.
Starting with the wait-fors, draw this program on the board and ask students
what they think it will do. (Note: you may have to change 40 to a different
number to accommodate lighting in your room) `
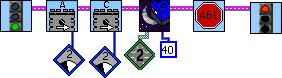
This program causes the robot to go forward until the light sensor reads a value
less than 40. (less than 40 means darker than 40) Then stops. The modifiers
attached to the motors are power level modifiers. Power levels control the speed
at which the motor moves, 5 is the fastest, 1 is the slowest. The light sensor
takes readings at regular intervals. If the robot moves too fast it may pass the
dark line before the light sensor can register it. To fix the problem this
program uses a low power level. Next is the wait-for-dark icon. This icon waits
for the light sensor attached to port 2 to read a number smaller than 40.
Once the students understand the above program show them this one:
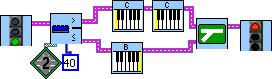
This program checks the light sensor the moment it starts. If it reads lighter
then 40 ( greater than 40) then the robot beeps twice and ends the program. Else
the program beeps once and stops. Generally this program is just an example of
using the if/else with a light sensor. Don.t spend too much time explaining the
program.
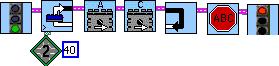
This last program is an example of a loop using the light sensor. This program
will cause the robot to go forward till it hits a black line then stop. The
light sensor loop in this program loops while the light sensor reads a value
greater than (lighter than) 40.
After explaining all this give the students the handout and let them work the
challenges.
Lesson
1 Lesson
2 Lesson
3 Lesson
4 Lesson
5 Lesson
6

Home