Home
Lesson
1 Lesson
2 Lesson
3 Lesson
4 Lesson
5 Lesson
6
Programming Loops
Note: Loops and Forks cover simmiler material and can be combined into a two
part class. I present them here as two days because students typically have
trouble understanding this topic if it is covered too quickly.
Topics
Loops
Handouts
Loops Challenges
Lesson
This lesson begins with an explaination of loops. Using a loop is similar to
hitting a repeat button. A loop repeats the commands between it's beginning and
end. A good way to explain this concept is to use something the students have
already done and are familiar with. A good example is to draw the program used
in the last lesson on the board and then loop it. Explain how before this
program only played one or two notes. Wouldn't it be nice if it could be used to
play a continuous stream of notes that were eaither C or E depending on if the
sensor is pushed in or not. This can be done by placing the whole program in a
loop. (Note: if there is no number modifier with this loop it will loop twice)
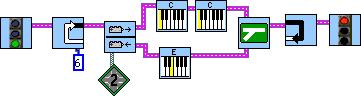
This program will loop a total of 6 times, producing between 12 and 6 notes
depending on when the touch sensor is pressed.
There are two different types of loops, the first kind loops a certain number of
times and are called general loops. The second kind, called while loops, loop
while the robot is in a certain state.
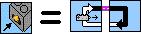
Draw this program on the board as an example:

This program will cause the robot to beep E continuously while the touch sensor
is released. I.e. it will keep beeping until the touch sensor is pushed in.
Make sure to stress the point that the robot will continue to loop as long as
the touch sensor is NOT pushed in. Many students have trouble with this point
and interpret the picture to mean that the loop will terminate when the touch
sensor is released. This is not correct and will confuse students.
Depending on the learning style of your students it may be helpful to explain
loops in terms of the wait-for commands.
The wait-for command, that waits for the touch sensor to be pushed in, does the
exact same thing as an empty loop that loops while the sensor is released. The
difference is that the wait-for command does nothing but wait till the sensor is
pushed in. The loop will continue exicuting the symbles between it's begining
and end as long as the sensor is NOT pressed.
After explaining loops pass out the Forks and Loops handout from the previous
lesson and have the students complete it.
Lesson
1 Lesson
2 Lesson
3 Lesson
4 Lesson
5 Lesson
6
Home