The first four practical sessions will be held in the classroom, the last three will be held in the Science Center. This is on the fourth floor, room 4102.
The practicals will require every group to bring at least one laptop computer with it. And groups should make sure that the correct software is installed on the laptop before the practical sessions.
Information on what this software is, where to download it from, and how to install it, can be found on the robot information page.
You should also read through the description of the practical exercise and print out and read any additional material supplied before the class.
[Exercise 1] [Exercise 2] [Exercise 3] [Exercise 4] [Exercise 5] [Exercise 6] [Exercise 7]
The pursuit race will work like this:
This exercise will require some preparation.
The code you need will combine the bumper-handling code of my demo program and (obviously) the line following code that comes packaged with BrickOS.
The code from this exercise must be handed in during the lecture the week after the practical class.
[Exercise 1] [Exercise 2] [Exercise 3] [Exercise 4] [Exercise 5] [Exercise 6] [Exercise 7]
We will try several different experiments, and they will require you to write a couple of different programs. However, there will be a common core to all the code.
As ever, this will work best if you write the code before you come to the practical.
The robot itself needs to be modified so that the light sensor "looks" forward along the robot chassis rather than down at the ground.
I will also be giving you a light emitting brick which you connect to the third output port, and set up as an active sensor.
The first program you will need has the following behaviors:
The code from this exercise must be handed in during the lecture the week after the practical class.
[Exercise 1] [Exercise 2] [Exercise 3] [Exercise 4] [Exercise 5] [Exercise 6] [Exercise 7]
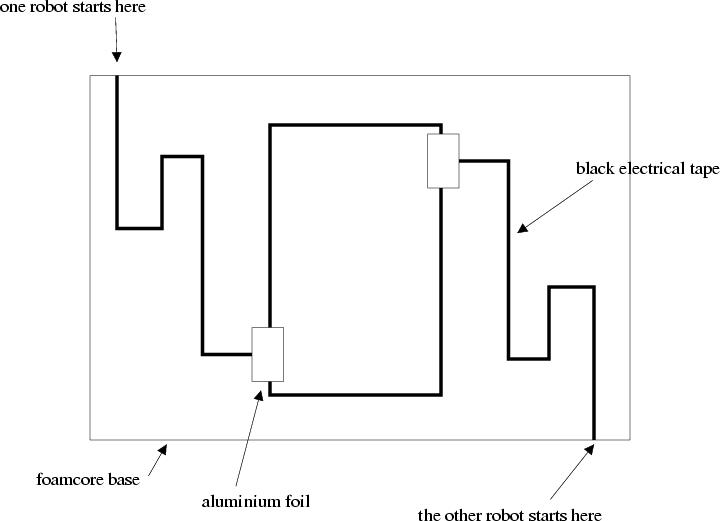
The Sumo course is as below:
The course will be built on a large piece of foamcore. About a third of this will be the sumo ring, marked by a rectangle of black electrical tape.
Each robot will have to follow a winding path to the ring from its start position. This path will be (almost) exactly the same for both robots.
The point at which the path meets the ring will be marked with a square of aluminium foil; this gives a light reading above that of the white foamcore and is typically very easy to detect.
Each robot will have to carry the same light source we used for the previous project so that both robots can "see" each other.
The rules of the sumo contest are as follows.
The code from this exercise must be handed in during the lecture the week after the practical class.
[Exercise 1] [Exercise 2] [Exercise 3] [Exercise 4] [Exercise 5] [Exercise 6] [Exercise 7]
[Exercise 1] [Exercise 2] [Exercise 3] [Exercise 4] [Exercise 5] [Exercise 6] [Exercise 7]
Before class you need to:
The code comes with a README, which explains the structure of the code, and is reasonably well commented, so it should be comprehensible.
You should only need to modify code in the Behavior subdirectory of metrobots-robocup-2004. This contains one file, MyTest.cc, which controls the robot.
Exercise 5 is to first compile the code and run it, and then write your own version of MyTest.cc, which makes use of at keast five of the pieces of behavior in BehaviorFunctions.cc.
[Exercise 1] [Exercise 2] [Exercise 3] [Exercise 4] [Exercise 5] [Exercise 6] [Exercise 7]
The aim of the exercise is to minimse the distance that the robot ends up from its starting point.
Run 10 trials of your code, measuring the absolute distance between where the robot ends up and its starting point.
Again the aim is to get the robot back as close as possible to its starting point.
[Exercise 1] [Exercise 2] [Exercise 3] [Exercise 4] [Exercise 5] [Exercise 6] [Exercise 7]
Again the aim is to get the robot back as close as possible to its starting point.
The thing that makes this harder than walking in a square is that you need to be able to walk to and from the ball without knowing, at compile time, how far the ball is from the robot.
If you look through the various .cc files in the Behavior directory of metrobots-robocup-2004, you will find code that looks for the ball, identifies when the ball is seen and so on. What you need to concentrate on in this exercise is tracking how far the robot has walked, and turning as precisely as possible through 180 degrees.
You also have to start using the vision system.
Information from the vision system (the Perception module) is delivered to the Behavior module by the function ReceiveFromPerception. This updates some internal variables (like see_ball) which should provide the information you need.
Note that while you are using the pink ball, the code makes reference to the ball being orange; don't let this confuse you (it won't confuse the robot because we will calibrate the vision so the robot thinks the ball is orange :-)
Go back to navigating round a 10ft square, but now place a marker 2 feet outside the corner (it needs to be that far back so the robot can see it), and use the fact that the robot can see the markers in order to decide when to turn and what direction to head in.
You should be able to use the same trick as in the code that walks to the ball (fix vision on the marker, turn the robot until the head and body are aligned, walk straight) to get to the marker, and use the same trick as when walking to the ball (measure the neck angle) to decide when you are close enough to it (this is more accurate than using distance estimates).
ReceiveFromPerception writes information about markers in the array marker[]. The four markers you have are marker[0], marker[1], marker[4], marker[5].
You should then be able to walk around the square from any point within it (by first looking for one of the markers. walking to it, and then circumnavigating, stopping when you get back to the first marker.
As before measure the error in your final position (from the point marker as the first corner).
[Exercise 1] [Exercise 2] [Exercise 3] [Exercise 4] [Exercise 5] [Exercise 6] [Exercise 7]